Hello Again!
Some pictures of the BT Home Hub (version 1):


And some pictures of BT Home Hub v1.5:


And they also come in Black!!!

The Home Hub v1 and Home Hub v1.5 are adsl wireless routers that were provided by UK ISP BT to their customers made by Thomson/Inventel (aka Technicolor/Alcatel) quite some time ago. The specifications are listed here under the Hardware section. You can still find them 'dumped' here in Pakistan ... some packaged nicely in their boxes as shown above ... and more importantly, mostly in good working condition.
I remember getting them both several years ago (when I didn't know anything about unlocking) and the disappointment when I realized that they were locked to BT*. At that time, these were the most featured devices available here locally not to mention great looking as well. Sadly, had to be stored away.
Unlike me however, other people didn't give up and when PsiDOC came along, a whole community came together resulting in huge interest in these routers. This thread captures the developments quite well though it can be a long read at 49 pages!!! Soon, many methods and uses for unlocking these were shared. Although wireless g might not be sufficient today, these routers are still very capable once 'unlocked'!
The main idea for unlocking these revolves around the fact that these routers are very similar to SpeedTouch 7G and ST790, both 'generic' routers by Thomson/Inventel as well, and could be made to run their firmware (once measures to prevent doing so are defeated). As psidoc.com is no more, I have decided to list all methods for unlocking here:
Method 1: jTAG
This was the initial method discovered utilizing specific test points on the pcb to communicate with the flash memory where modified CFE/bootloader and/or modified firmware can be written.
(To continue reading, please click on 'Read More')
Though this is a difficult method for unlocking, it is still important to understand it as the same method can be used to de-brick the router if anything goes wrong with any of the other methods. In fact, one should be prepared for this before messing with bootloader and/or firmware of any router.
I have made a pdf of the original post by psidoc available here: http://1drv.ms/1EmDlSp
I have also uploaded the original file uploaded by psidoc here: http://1drv.ms/1EmDlSp
(This also has a doc file explaining this method and some helpful images ... the password for the flash file is: "www.psidoc.com" without the quotes)
I personally used this method to unlock a v1.5 hub and it worked after a few tries (once I got the cable and timing right). I was given a supposedly (hard) bricked linksys router later and it had to have the whole firmware flashed again ... a 16 hours long process ... and this experience helped a lot!
Method 2 (only for HHv1): Quick Firmware Flash
This involves flashing the firmware for SpeedTouch 7G, with its header modified, onto the Home Hub v1 as documented here. However, DECT/VoIP functionality may not work and you cannot upgrade to newer firmware due to the restrictive CFE being still there. Kindly see method 3 below for the files!
Method 3 (Recommended): Changing CFE via Software
This method is based upon the USB exploit (thanks to 'surrealiz3' and 'simonh') applicable to some Thomson routers (on older firmware) combined with the script exploit for root access. I think it involves creating a usb with linux format (these routers run a form of linux) that has a Symbolic Link (symlink) to the system (sys) folder and when the usb disk is mounted by the router's firmware, it essentially gives read write access to the sys folder. From there, shell access is obtained by transferring some files (a samba configuration file and a telnet daemon) allowing replacing the CFE with a patched/new one. There is some risk of bricking in case flashing is interrupted or corrupted and in such an unfortunate case, one shall have to resort to Method 1 to revive the router.
This Method also works well on HHv1.5!
The files for Method 2 and Method 3 are uploaded here as BT HH Mega Unlock by psidoc: http://1drv.ms/1OCGzZM
RedBoot:
RedBoot is an open source bootloader. It can make loading and using custom firmware much easier. As far as the home hubs are concerned, redboot was made possible as a result of another router by Inventel/Thomson called the Livebox using redboot ... for Livebox, look into the work of 'danitool'. There are several versions available, but, you may follow the guidelines as uploaded here: http://1drv.ms/1GEjDSY for your intended firmware!
This allows OpenWRT: http://1drv.ms/1EBXTYp ... for potentially newer info, please see: http://wiki.openwrt.org/toh/bt/homehub_v1 ... on the home hubs and also allows Newer Builds (uploaded here: http://1drv.ms/1GEibjn) based upon GPLed firmware images by BT built by 'john101a'!
(I'll be adding to this post soon ... mainly screenshots following Method 3 to flash ST790's Firmware onto a HHv1.5 ... and also configuration of the firmware for my current ISP)
Updated 15th June, 2015: Screenshots for Method 3 using the BT HH Mega Unlock by psidoc
Cautions:
- Use of Win 7 or WinXP for firmware upgrade and/or recovery tools is recommended unlike the preview win 10 OS used by me
- Firmware upgrade and/or recovery process cannot be interrupted as it may cause the router to 'brick'
- Follow at your own risk!
- The lights on the hub shall be 'messed' up during the process!
- The USB Storage Network Access feature will be 'limited' to USB Printer Sharing after firmware update
I am using a (black) HHV1.5 in this case, but the process should be same for the HHV1.
Step 1: (After Reset via Pinhole Button) Logging in to the Home Hub via web-browser http://192.168.1.254 ... with newer firmware, one has to change the 'admin' password


Continuing to Advanced Settings to take a look at System Info ... using username 'admin' without quotes and using the password selected earlier when prompted!
We need to have 6.2.2.6 and this one is newer than that ... a downgrade is needed! The firmware version is also present at the bottom of every page as the footer!

For the process, it is best to use a static IP address:

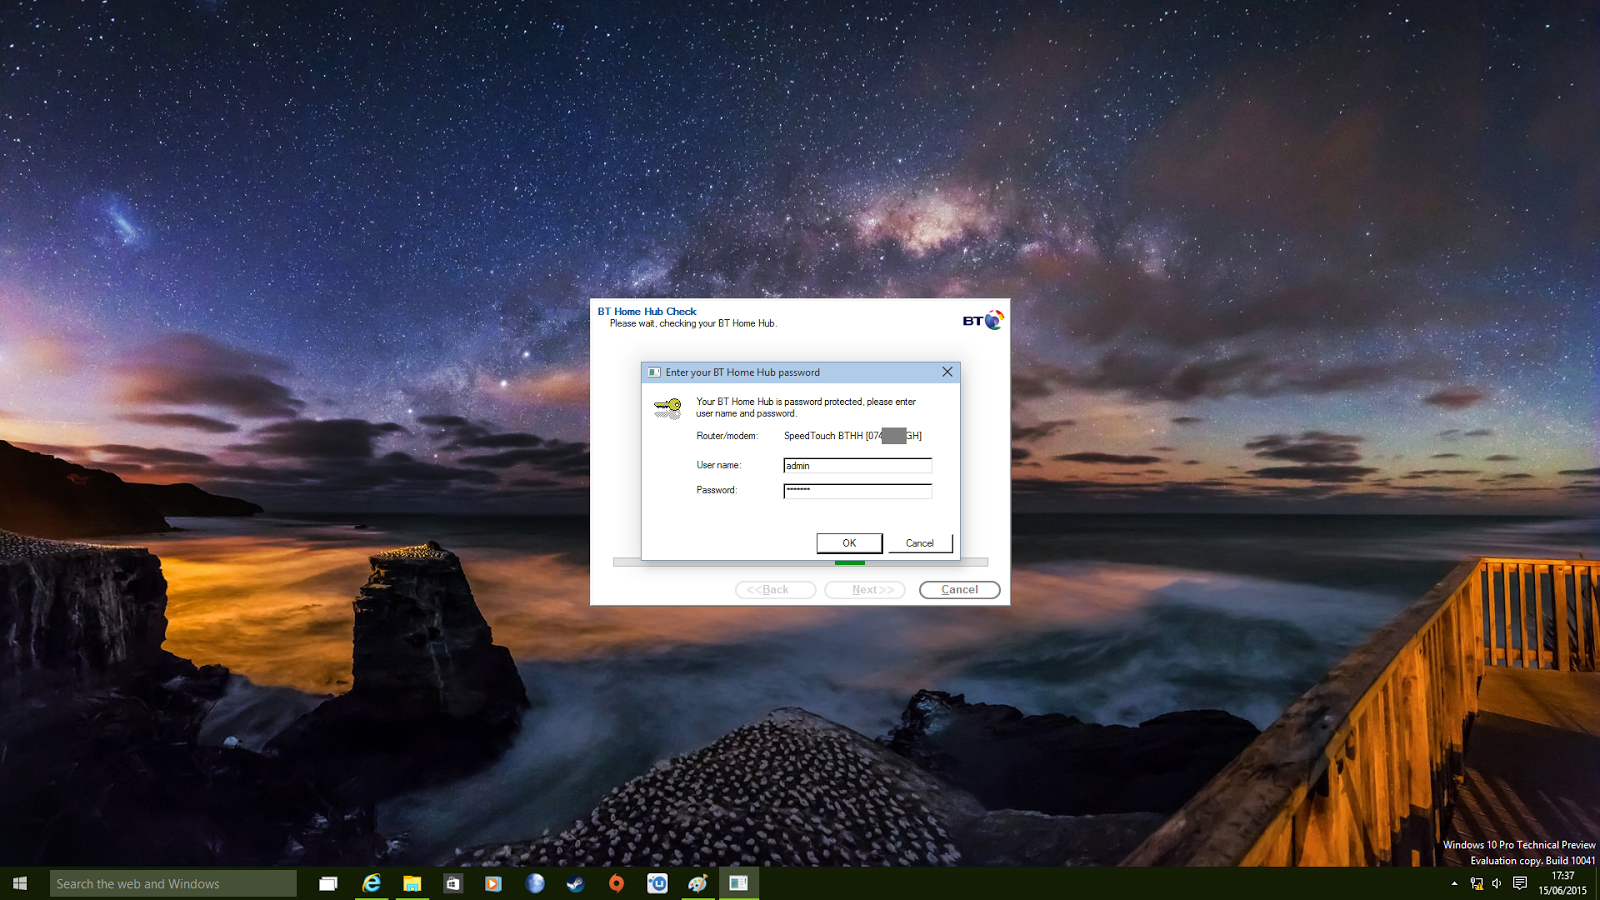
Step 2: Downgrading the firmware in this case via the BT Recovery Tool ... have to run it as Administrator on this version of Win OS


When prompted by the Firewall, both boxes may be checked as sometimes Windows sees the connection as Public instead of Private (especially true for Win 8 and later)

Using the same credentials as for logging into the web interface's Advanced Settings!
Tip: For Win 8 and later one might have to use ipconfig /renew via the Command Prompt after the hub restarts!


Logging into the web interface confirms the downgrade/recovery!

Step 3: Getting root access to upload files! Telnet is required ... Telnet Client needs to be installed for WinVista and later versions of Win OS ... one way is described here: http://windows.microsoft.com/en-us/windows/telnet-faq#1TC=windows-7 ... PuTTY utility can also be used for telnet access

Using same credentials as before:

Once logged in, I'll enter the commands as shown to run the script ... it is easier to copy and paste via Notepad ... you may also use the username and password of your choice but do remember to use the same latter as well


Confirm successful execution by logging in again but using the 'root' user's credentials this time ... confirmed!

Rebooting the router

Step 4: FTP File Upload
Using a new Command Prompt window, I'll navigate to the 'ForFTP' folder included in the Mega Unlock package (see Method 3 above for download)

Uploading files manually generally has worked better for me than the automated batch (.bat) script


Step 5: USB Disk/Flash File Transfer
I'll copy files as per the guide to the disk


Unmount the disk and insert it into the USB port at the back of the router ... done!
Step 6: Replacing the CFE
As per the guide, initiate a telnet session to 192.168.1253 at port 4002 ... done!
Tip: Typing \\192.168.1.253 into the Run Window (WinKey + R) to browse the network location might help in starting the telnet daemon


Carefully, follow the guide and run the commands line by line taking care not to miss a step ... copying and pasting commands might come in handy in this case as well:

Once finished ... power cycle the router and wait for some time for the router to settle down as per the guide!
Step 7: Uploading the Firmware
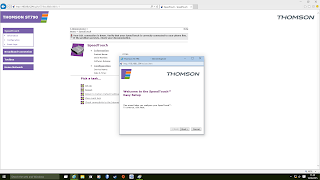
At this point, 'new' firmware can be uploaded to the router via the SpeedTouch Upgrade Wizard included in the package! However, as this is quite an old version and may not run properly on Win 8 and later versions of Win OS I decided to use the Thomson Upgrade Wizard (I'll upload it alongside the BT HH Mega Unlock package by psidoc)


In this case, I have selected the 7.4.1.7 firmware


...
The process finished successfully by using the Thomson Upgrade Wizard in this case


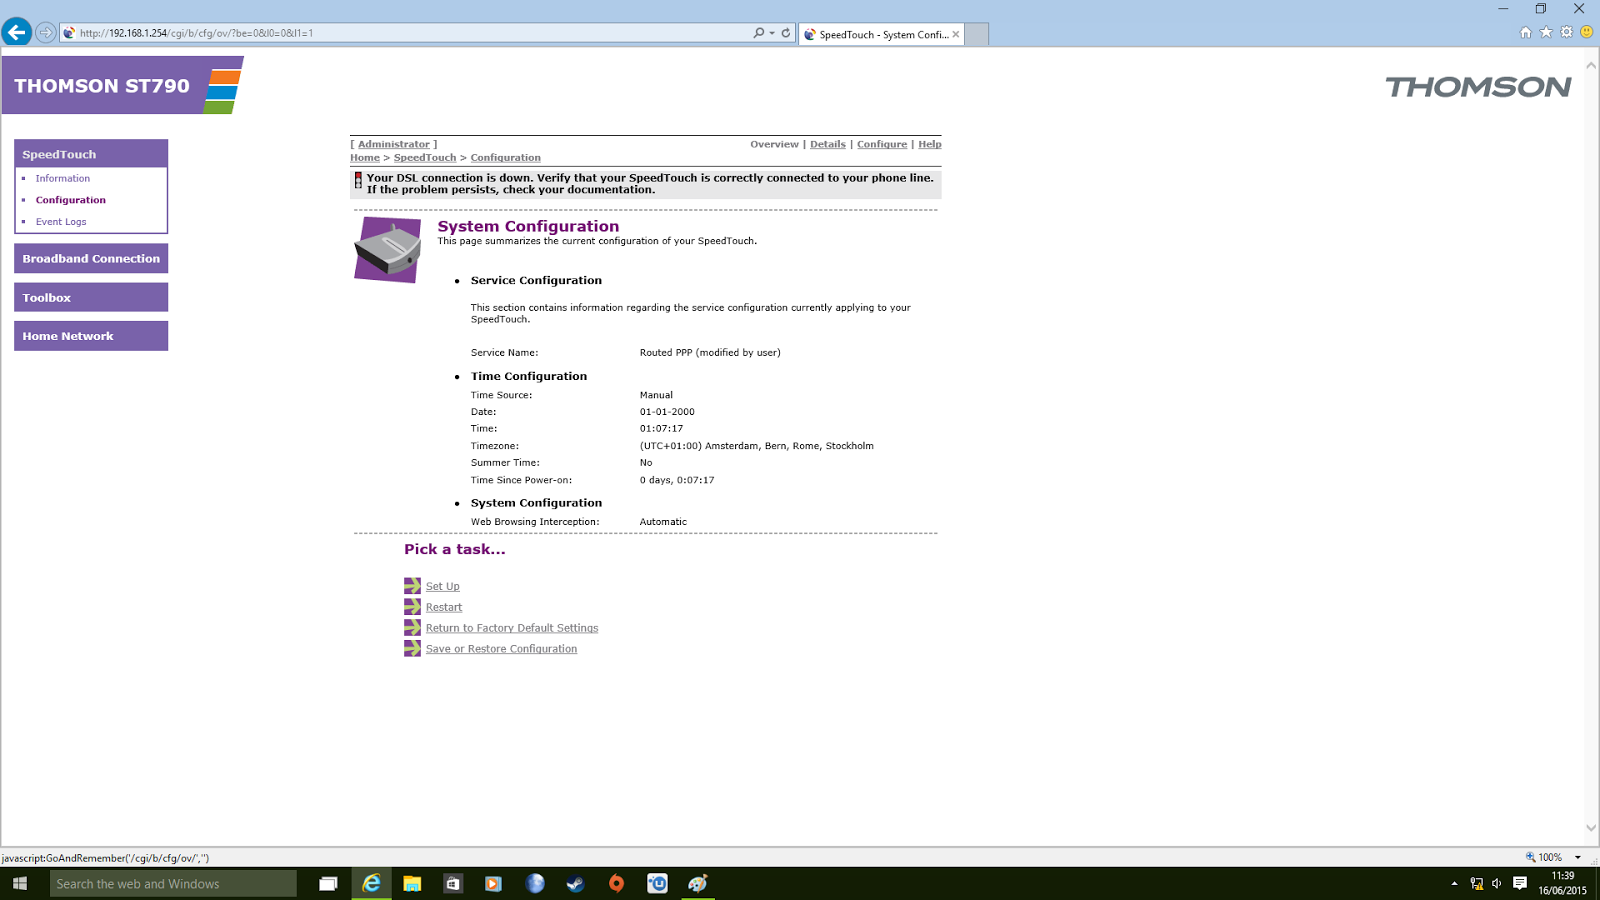
Here is what we get after the upgrade process:


It is a good idea to reset the router to default settings to clear any leftover configuration settings from the older firmware:


Now, all that is needed is to configure the device for the particular ISP via the Set-Up option in the interface ... the SpeedTouch/Thomson Configuration Wizard provides even more options if needed and the CLI even more than the Wizard!
I'll add the screenshots for them as well sometime soon!
Updated 18th June, 2015: Screenshots for Configuration via built-in Setup Wizard
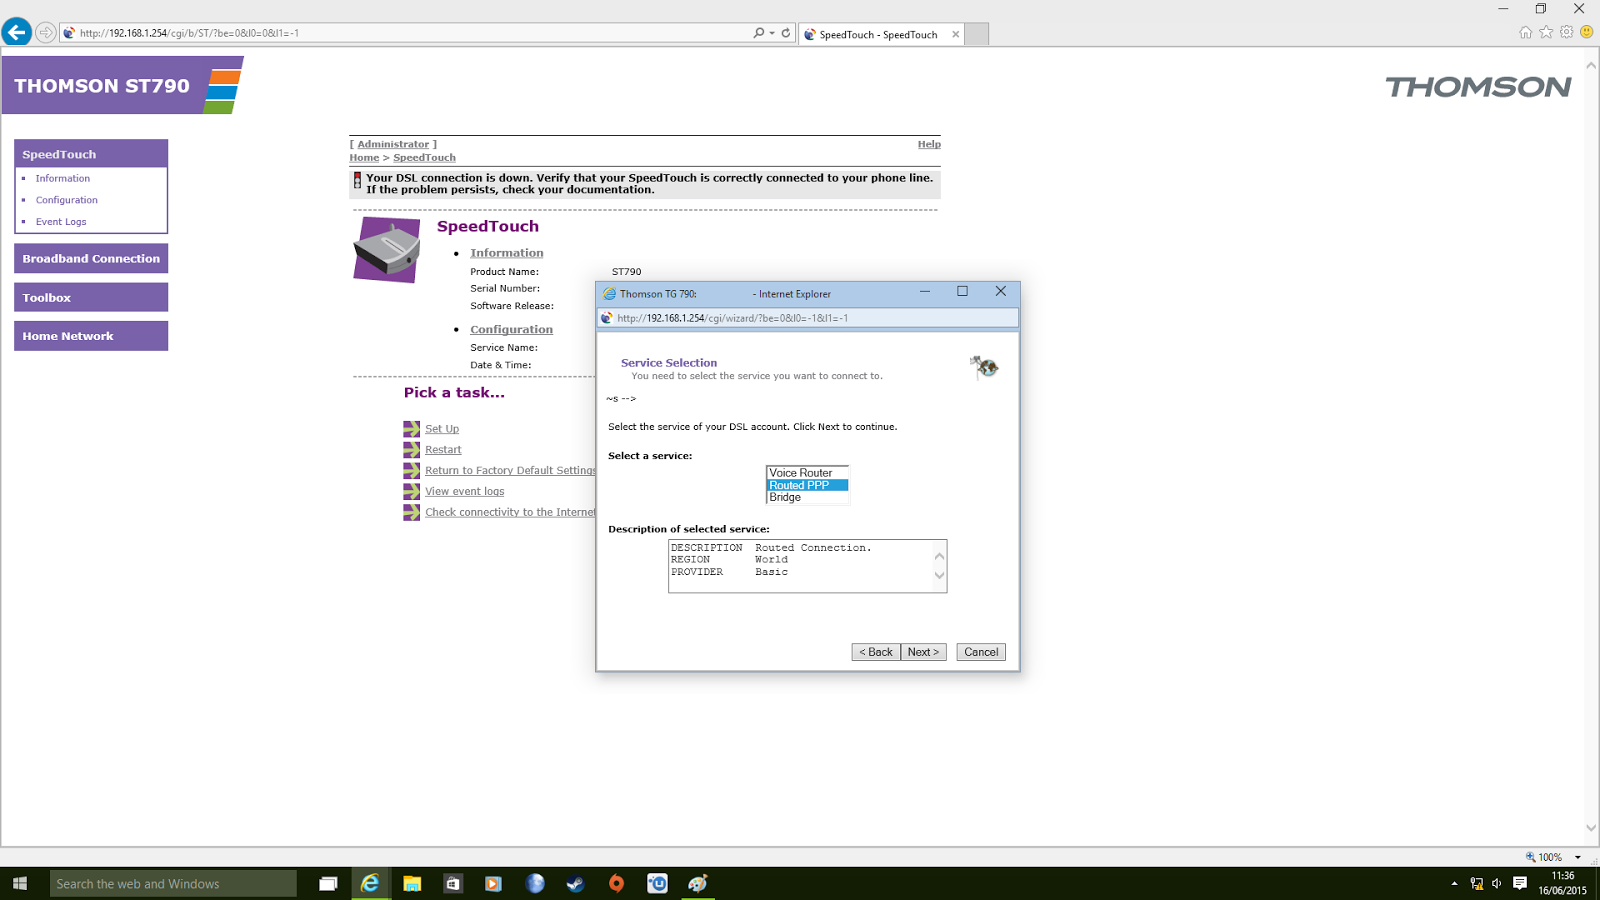
In this case, I'll configure the same home hub using the built-in Setup Wizard and the Web GUI for our ISP PTCL (ONU Type ... for Copper, the standalone SpeedTouch/Thomson Setup Wizard is needed)

Routed PPP will do in this case ... we'll take a look Voice features sometime later!

For PTCL's ONU/Fiber connection, VPI/VCI is 8/81 ... this can be selected from the drop-down list ... also connection type is PPPoE

Username and Password for DSL as provided by the ISP PTCL in this case:

Here, one can select username and password for accessing the Web GUI (and Telnet) as an Administrator

A review of the settings


Done!

Some additional settings are suggested below:
- Time and Date


- Enabling the Firewall


- Configuring Wireless Connection


Testing out the connection:

Note: Your line stats may vary as per the quality of your line!

Browsing is working well! A successful unlock!!!
Updated 18th August, 2015: Screenshots for Configuration via Thomson/SpeedTouch Configuration Wizard
In some cases like when there is a different combination of VPI and VCI, the separate Thomson/SpeedTouch Configuration Wizard comes in handy. Also, some configuration templates are only available via this separate piece of software. Fortunately, it works well with the home hub routers (there are many different versions of this 'wizard', with most being collected at the now defunct modem-help.co.uk ... one might need to edit the template '.tpl' files for the wizard to work by adding the model/make of the router to the list or routers in the list). I have uploaded an older version's iso image in 7-zip format that works better with the home hub routers at: http://1drv.ms/1Pkj8jU. A 'virtual' disc drive like the Virtual Clone Drive by SlySoft might come in handy.


- Might have to use Compatibility Mode:


- You'll need all of the above to configure the connection


- There are many configuration templates applicable! I have selected Routed PPP under basic for my connection as it uses PPPoE! One can also select bridge mode or the hub can also be configured as a WAN router depending upon the templates included!


- Note that changes to the Wifi Configuration might not be applied ... just use the router's web interface in such a case!


- There, the VPI and VCI have been applied successfully ... note that these are not present in the built-in configuration wizard of the router!
In Part 2, we'll take a look at some more options provided by the Thomson CLI (via Telnet) and also at the Voice features given the fact that the home hub is a DECT base-station with it's own brand of hub (cordless) phones :)

* requires specific domain for username in format of username@domain for authentication with a list of acceptable domain names! So, could work for other ISPs without unlocking if configured as such!
Some pictures of the BT Home Hub (version 1):
And some pictures of BT Home Hub v1.5:
And they also come in Black!!!
The Home Hub v1 and Home Hub v1.5 are adsl wireless routers that were provided by UK ISP BT to their customers made by Thomson/Inventel (aka Technicolor/Alcatel) quite some time ago. The specifications are listed here under the Hardware section. You can still find them 'dumped' here in Pakistan ... some packaged nicely in their boxes as shown above ... and more importantly, mostly in good working condition.
I remember getting them both several years ago (when I didn't know anything about unlocking) and the disappointment when I realized that they were locked to BT*. At that time, these were the most featured devices available here locally not to mention great looking as well. Sadly, had to be stored away.
Unlike me however, other people didn't give up and when PsiDOC came along, a whole community came together resulting in huge interest in these routers. This thread captures the developments quite well though it can be a long read at 49 pages!!! Soon, many methods and uses for unlocking these were shared. Although wireless g might not be sufficient today, these routers are still very capable once 'unlocked'!
The main idea for unlocking these revolves around the fact that these routers are very similar to SpeedTouch 7G and ST790, both 'generic' routers by Thomson/Inventel as well, and could be made to run their firmware (once measures to prevent doing so are defeated). As psidoc.com is no more, I have decided to list all methods for unlocking here:
Method 1: jTAG
This was the initial method discovered utilizing specific test points on the pcb to communicate with the flash memory where modified CFE/bootloader and/or modified firmware can be written.
(To continue reading, please click on 'Read More')
Though this is a difficult method for unlocking, it is still important to understand it as the same method can be used to de-brick the router if anything goes wrong with any of the other methods. In fact, one should be prepared for this before messing with bootloader and/or firmware of any router.
I have made a pdf of the original post by psidoc available here: http://1drv.ms/1EmDlSp
I have also uploaded the original file uploaded by psidoc here: http://1drv.ms/1EmDlSp
(This also has a doc file explaining this method and some helpful images ... the password for the flash file is: "www.psidoc.com" without the quotes)
I personally used this method to unlock a v1.5 hub and it worked after a few tries (once I got the cable and timing right). I was given a supposedly (hard) bricked linksys router later and it had to have the whole firmware flashed again ... a 16 hours long process ... and this experience helped a lot!
Method 2 (only for HHv1): Quick Firmware Flash
This involves flashing the firmware for SpeedTouch 7G, with its header modified, onto the Home Hub v1 as documented here. However, DECT/VoIP functionality may not work and you cannot upgrade to newer firmware due to the restrictive CFE being still there. Kindly see method 3 below for the files!
Method 3 (Recommended): Changing CFE via Software
This method is based upon the USB exploit (thanks to 'surrealiz3' and 'simonh') applicable to some Thomson routers (on older firmware) combined with the script exploit for root access. I think it involves creating a usb with linux format (these routers run a form of linux) that has a Symbolic Link (symlink) to the system (sys) folder and when the usb disk is mounted by the router's firmware, it essentially gives read write access to the sys folder. From there, shell access is obtained by transferring some files (a samba configuration file and a telnet daemon) allowing replacing the CFE with a patched/new one. There is some risk of bricking in case flashing is interrupted or corrupted and in such an unfortunate case, one shall have to resort to Method 1 to revive the router.
This Method also works well on HHv1.5!
The files for Method 2 and Method 3 are uploaded here as BT HH Mega Unlock by psidoc: http://1drv.ms/1OCGzZM
RedBoot:
RedBoot is an open source bootloader. It can make loading and using custom firmware much easier. As far as the home hubs are concerned, redboot was made possible as a result of another router by Inventel/Thomson called the Livebox using redboot ... for Livebox, look into the work of 'danitool'. There are several versions available, but, you may follow the guidelines as uploaded here: http://1drv.ms/1GEjDSY for your intended firmware!
This allows OpenWRT: http://1drv.ms/1EBXTYp ... for potentially newer info, please see: http://wiki.openwrt.org/toh/bt/homehub_v1 ... on the home hubs and also allows Newer Builds (uploaded here: http://1drv.ms/1GEibjn) based upon GPLed firmware images by BT built by 'john101a'!
(I'll be adding to this post soon ... mainly screenshots following Method 3 to flash ST790's Firmware onto a HHv1.5 ... and also configuration of the firmware for my current ISP)
Updated 15th June, 2015: Screenshots for Method 3 using the BT HH Mega Unlock by psidoc
Cautions:
- Use of Win 7 or WinXP for firmware upgrade and/or recovery tools is recommended unlike the preview win 10 OS used by me
- Firmware upgrade and/or recovery process cannot be interrupted as it may cause the router to 'brick'
- Follow at your own risk!
- The lights on the hub shall be 'messed' up during the process!
- The USB Storage Network Access feature will be 'limited' to USB Printer Sharing after firmware update
Step 1: (After Reset via Pinhole Button) Logging in to the Home Hub via web-browser http://192.168.1.254 ... with newer firmware, one has to change the 'admin' password


Continuing to Advanced Settings to take a look at System Info ... using username 'admin' without quotes and using the password selected earlier when prompted!
We need to have 6.2.2.6 and this one is newer than that ... a downgrade is needed! The firmware version is also present at the bottom of every page as the footer!

For the process, it is best to use a static IP address:

Step 2: Downgrading the firmware in this case via the BT Recovery Tool ... have to run it as Administrator on this version of Win OS


When prompted by the Firewall, both boxes may be checked as sometimes Windows sees the connection as Public instead of Private (especially true for Win 8 and later)

Using the same credentials as for logging into the web interface's Advanced Settings!
Tip: For Win 8 and later one might have to use ipconfig /renew via the Command Prompt after the hub restarts!


Logging into the web interface confirms the downgrade/recovery!

Step 3: Getting root access to upload files! Telnet is required ... Telnet Client needs to be installed for WinVista and later versions of Win OS ... one way is described here: http://windows.microsoft.com/en-us/windows/telnet-faq#1TC=windows-7 ... PuTTY utility can also be used for telnet access

Using same credentials as before:

Once logged in, I'll enter the commands as shown to run the script ... it is easier to copy and paste via Notepad ... you may also use the username and password of your choice but do remember to use the same latter as well


Confirm successful execution by logging in again but using the 'root' user's credentials this time ... confirmed!

Rebooting the router

Step 4: FTP File Upload
Using a new Command Prompt window, I'll navigate to the 'ForFTP' folder included in the Mega Unlock package (see Method 3 above for download)

Uploading files manually generally has worked better for me than the automated batch (.bat) script


Step 5: USB Disk/Flash File Transfer
I'll copy files as per the guide to the disk


Unmount the disk and insert it into the USB port at the back of the router ... done!
Step 6: Replacing the CFE
As per the guide, initiate a telnet session to 192.168.1253 at port 4002 ... done!
Tip: Typing \\192.168.1.253 into the Run Window (WinKey + R) to browse the network location might help in starting the telnet daemon


Carefully, follow the guide and run the commands line by line taking care not to miss a step ... copying and pasting commands might come in handy in this case as well:

Once finished ... power cycle the router and wait for some time for the router to settle down as per the guide!
Step 7: Uploading the Firmware
At this point, 'new' firmware can be uploaded to the router via the SpeedTouch Upgrade Wizard included in the package! However, as this is quite an old version and may not run properly on Win 8 and later versions of Win OS I decided to use the Thomson Upgrade Wizard (I'll upload it alongside the BT HH Mega Unlock package by psidoc)


In this case, I have selected the 7.4.1.7 firmware


...
The process finished successfully by using the Thomson Upgrade Wizard in this case


Here is what we get after the upgrade process:


It is a good idea to reset the router to default settings to clear any leftover configuration settings from the older firmware:


Now, all that is needed is to configure the device for the particular ISP via the Set-Up option in the interface ... the SpeedTouch/Thomson Configuration Wizard provides even more options if needed and the CLI even more than the Wizard!
I'll add the screenshots for them as well sometime soon!
Updated 18th June, 2015: Screenshots for Configuration via built-in Setup Wizard
In this case, I'll configure the same home hub using the built-in Setup Wizard and the Web GUI for our ISP PTCL (ONU Type ... for Copper, the standalone SpeedTouch/Thomson Setup Wizard is needed)


Routed PPP will do in this case ... we'll take a look Voice features sometime later!
For PTCL's ONU/Fiber connection, VPI/VCI is 8/81 ... this can be selected from the drop-down list ... also connection type is PPPoE

Username and Password for DSL as provided by the ISP PTCL in this case:

Here, one can select username and password for accessing the Web GUI (and Telnet) as an Administrator

A review of the settings


Done!
Some additional settings are suggested below:
- Time and Date


- Enabling the Firewall


- Configuring Wireless Connection


Testing out the connection:

Note: Your line stats may vary as per the quality of your line!

Browsing is working well! A successful unlock!!!
Updated 18th August, 2015: Screenshots for Configuration via Thomson/SpeedTouch Configuration Wizard
In some cases like when there is a different combination of VPI and VCI, the separate Thomson/SpeedTouch Configuration Wizard comes in handy. Also, some configuration templates are only available via this separate piece of software. Fortunately, it works well with the home hub routers (there are many different versions of this 'wizard', with most being collected at the now defunct modem-help.co.uk ... one might need to edit the template '.tpl' files for the wizard to work by adding the model/make of the router to the list or routers in the list). I have uploaded an older version's iso image in 7-zip format that works better with the home hub routers at: http://1drv.ms/1Pkj8jU. A 'virtual' disc drive like the Virtual Clone Drive by SlySoft might come in handy.


- Might have to use Compatibility Mode:


- You'll need all of the above to configure the connection


- There are many configuration templates applicable! I have selected Routed PPP under basic for my connection as it uses PPPoE! One can also select bridge mode or the hub can also be configured as a WAN router depending upon the templates included!


- Note that changes to the Wifi Configuration might not be applied ... just use the router's web interface in such a case!


- There, the VPI and VCI have been applied successfully ... note that these are not present in the built-in configuration wizard of the router!
In Part 2, we'll take a look at some more options provided by the Thomson CLI (via Telnet) and also at the Voice features given the fact that the home hub is a DECT base-station with it's own brand of hub (cordless) phones :)

* requires specific domain for username in format of username@domain for authentication with a list of acceptable domain names! So, could work for other ISPs without unlocking if configured as such!
Hi, I have the 1.0 version, I adore the nostalgia of it as it used to be somthing that fascinated me when I was 6 years old as my Gran has BT Broadband, Anyway I am allot older now and having one my self now i am older and can experience it a whole lot more is lovely but it isnt perfect, I have it on and the phones synced however only 3 of 5 lights are on and I cant find anyway to get them to come on so I was wondering if with your extensive knowledge you know I way I could get the Internet and Broadband Light to come on even though there is no connection, In Telnet there is a setting which allows you to change the lights thats how I got the Phone light to come on however no matter what I try I cant get the Broadband and Internet light to stay light and I really want it to be perfect!
ReplyDelete